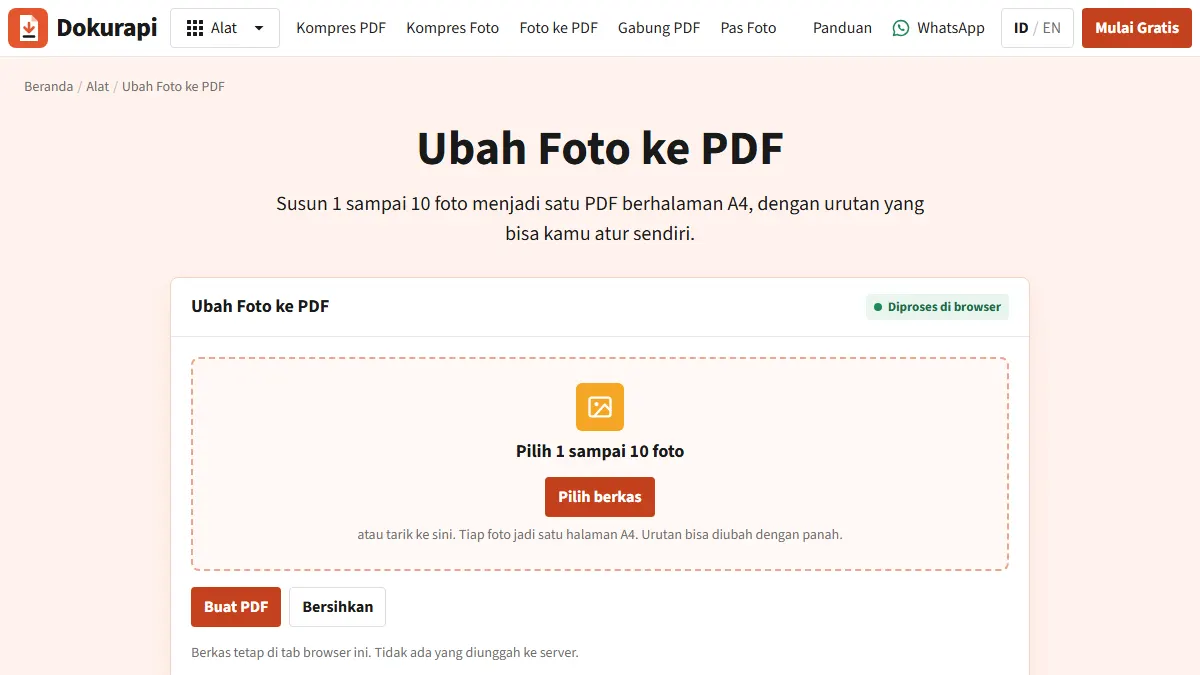
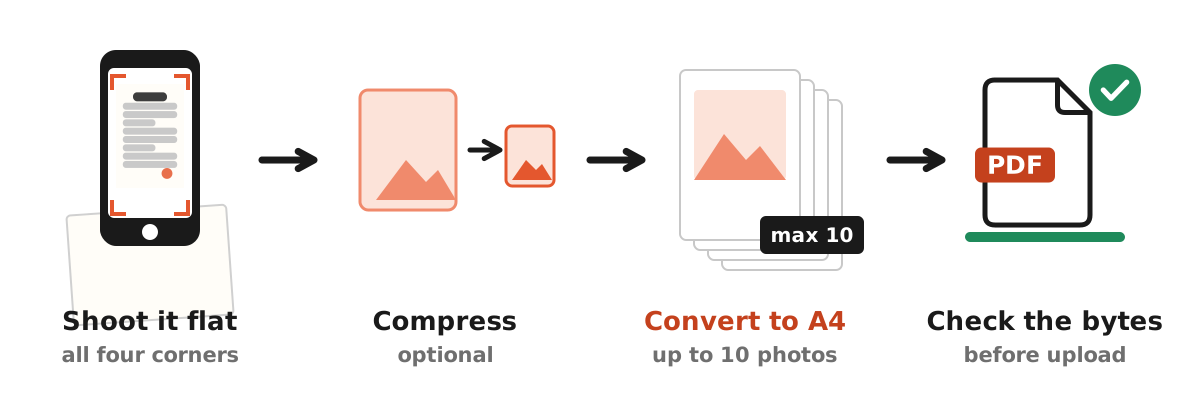
To turn a photo to PDF without installing anything, open the Dokurapi Photo to PDF tool, add up to ten photos, put them in order, and press create. Each photo becomes one portrait A4 page and the PDF downloads straight away. The work happens inside your browser tab, so pictures of your degree certificate, mark sheet, or ID card are never sent to a server.
Conversion is the easy part. The thing that actually gets applications rejected is file size: a PDF built from full-resolution phone photos is usually far bigger than an exam board, university, or job portal will accept. This guide covers the conversion itself, a simple way to budget kilobytes per page, and the problems people run into most often.
How to convert a photo to PDF with Dokurapi
- Open the Photo to PDF tool on your phone or laptop. No account is needed.
- Tap the drop area or drag your images in. JPG, PNG, and WebP files work, up to ten per run.
- Use the up and down arrows to set the page order, for example the front of a certificate before the back.
- Remove anything that should not be there. A blurry duplicate on page three looks careless to a reviewer.
- Press create. A file called
dokurapi-foto.pdfdownloads. - Rename it the way the portal asks, then open it once to check the order and that every line is readable.
The steps take under a minute. What happens inside the tool is still worth two minutes of reading, because it explains most of the size and sharpness surprises people hit later, when the portal rejects the file or a reviewer cannot read a serial number.
Ready to try it? The tool is free and runs in your browser.
Open the Photo to PDF toolWhat the tool does to each photo
At the time of writing, every photo becomes one portrait A4 page measuring 595.28 by 841.89 points, the A4 size in PDF units. The photo is scaled to fit inside that page, centred, and keeps its proportions. Nothing is cropped or stretched, so any photo whose shape differs from A4 gets white bands. How the image data is stored depends on the file type:
| File type | What the tool does | Effect on PDF size |
|---|---|---|
| JPG / JPEG | Places the file into the PDF as it is, without recompression | The page weighs about as much as the photo |
| PNG | Places the file as it is, without recompression | Often much heavier than a JPG of the same page |
| WebP and other formats your browser can open | Redraws the image as a JPG at 90% quality on a white background, long side capped at 1,800 pixels | Usually smaller than a full-size original; transparent areas turn white |
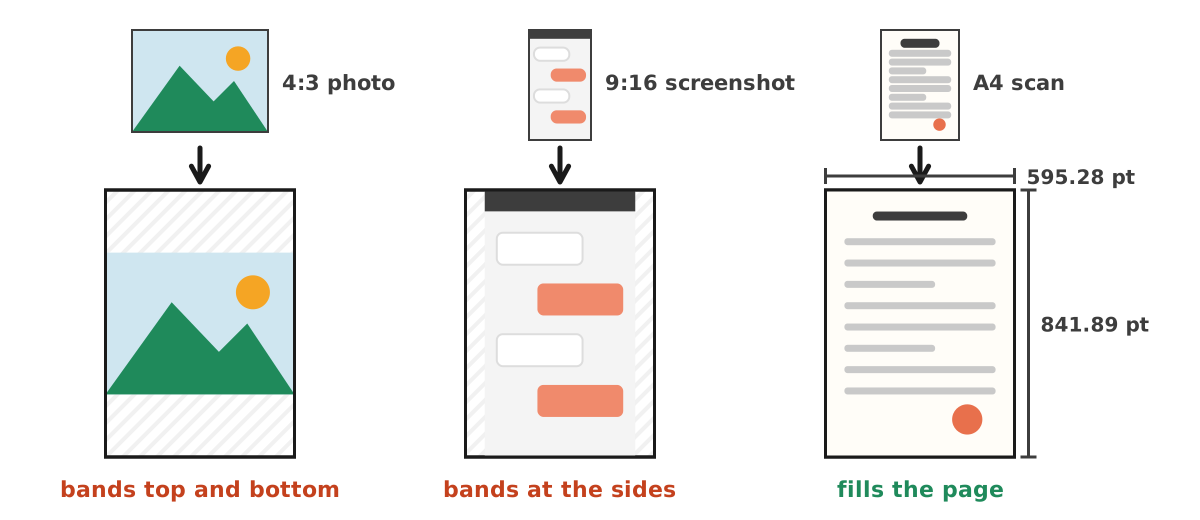
Two details catch people out. First, the fit works in both directions: a small photo is enlarged to fill the page width or height, so a 600 pixel image will look soft once a reviewer zooms in. Start from the original camera file, not a copy that went through a chat app, which often shrinks pictures along the way.
Second, the tool shows the finished size in a short "Done" message right after it builds the file, so you know at once whether you are over budget. The PDF itself is assembled with the open-source pdf-lib library, which the page loads from Dokurapi's own site.
Take a better photo first
No converter can straighten a skewed page or recover text hidden by glare. A few habits make a bigger difference than any setting:
- Lay the document flat and hold the phone directly above it, not at an angle.
- Use even daylight and turn the flash off for laminated or glossy certificates.
- Keep all four corners in frame so seals, serial numbers, and signatures are visible.
- Shoot on a contrasting surface, then crop away the table before converting.
Here is an unpopular opinion: the highest resolution your phone offers is rarely the right choice for a portal. For an A4 page viewed on screen, a long side of roughly 1,600 to 2,000 pixels usually keeps small print readable. Anything beyond that is kilobytes you will have to cut later. Screenshots deserve a warning too. They are typically PNG, and a PNG of a photographed page is often much heavier than a JPG of the same content.
Budget the file size before you convert
A PDF is a container. Three 2 MB photos make a PDF of around 6 MB, because an honest converter does not quietly lower the quality of your images. So work out a per-page budget from the portal's limit.
Two numbers matter. Dokurapi counts 1 KB as 1,000 bytes and 1 MB as 1,000,000 bytes, the decimal SI convention described by NIST. Some operating systems count in multiples of 1,024, which is why sizes can look slightly different from one screen to another. Our compression tools also apply a 6% safety margin, so a 200 KB target is treated as about 188 KB (188,000 bytes). That gap absorbs rounding differences that could otherwise push a file a few bytes over the line.
| Portal limit | Safe target (94%) | Example budget |
|---|---|---|
| 200 KB | 188,000 bytes | 1 page, about 180 KB for the photo |
| 500 KB | 470,000 bytes | 3 pages, about 150 KB per photo |
| 1 MB | 940,000 bytes | 4 pages, about 225 KB per photo |
| 2 MB | 1,880,000 bytes | 4 pages, about 450 KB per photo |
Leave a little room for the PDF structure itself. The budgets above already include some slack.
If your source photos are already JPGs and the main goal is a compact file, the guide to compressing JPG to PDF walks through the same idea with more examples.
Worked example: a two-page certificate under 800 KB
Say an upload field asks for a degree certificate as one PDF of at most 800 KB, the limit the 2023 SSCASN FAQ gave for that document. The front is busy, with a seal, a signature, and a small serial number. The back is mostly blank. Here is how the budget plays out:
- Work out the safe ceiling: 94% of 800 KB is 752,000 bytes.
- Open the image compressor with the front photo and type a custom target of 400 KB. With the 6% margin, the tool aims for 376,000 bytes or less.
- Repeat for the back with a 300 KB target, which aims for 282,000 bytes or less.
- Add both compressed JPGs to the Photo to PDF tool, front first, and create the PDF. Because JPGs go in as they are, the PDF lands close to the two photos combined: at most about 658,000 bytes plus a little PDF structure.
- Drop the PDF into the size checker with the limit set to 800 KB. It shows the exact byte count, the page count, and how much room is left.
That leaves about 94,000 bytes of headroom under the safe ceiling, plenty for the PDF structure. If the front still looks soft at 400 KB, move budget from the back instead of raising the total. The guide to checking file size before upload explains why the checker's byte count beats the number your phone shows.
Compress the photos first, or the PDF afterwards?
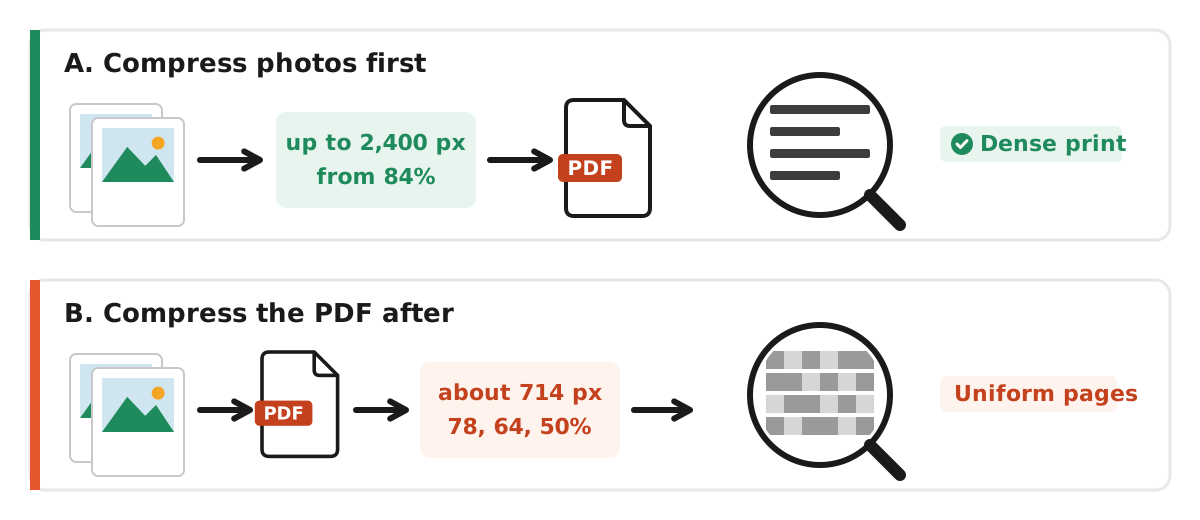
There are two ways to bring a photo PDF under the limit. They are not equal when the page has small print, and the tool code shows why.
| Route | How | Best for |
|---|---|---|
| A. Photos first | Shrink each image to its page budget, then convert | Certificates where one page has dense print and another is mostly blank |
| B. PDF afterwards | Convert everything, then compress the PDF to one target | Uniform pages, such as a three-page transcript |
For important documents we prefer route A. The image compressor works on one photo at a time, keeps the long side at up to 2,400 pixels, and starts at 84% JPEG quality, stepping down only as far as the target requires. It also lets you give the dense front of a certificate 400 KB and the plain back 300 KB instead of cutting both equally.
Route B is faster but blunter. The PDF compressor re-renders every page as an image. For an A4 page made by the Photo to PDF tool, its first attempt is about 714 pixels wide at 78% JPEG quality, and it can drop to 595, 488, or 404 pixels and down to 50% quality when the target demands it.
A photo PDF has no selectable text to lose, but it can lose fine detail. That is fine for a plain transcript and risky for a certificate with tiny serial numbers. If the result still misses the target, what to do when a compressed file is still too big covers the next moves.
Either way, finish by reading the real byte count with the PDF size checker rather than trusting the number in a file name.
Check the rule in the official notice
Exam boards, universities, visa centres, and recruiters each set their own format and size rules, and they change between cycles. If you are applying through an Indian recruitment or admission portal, look for the size and format listed next to each upload field in the current notification, and trust that over a forum post or last year's coaching-centre PDF.
As one documented example from Indonesia, the 2023 civil service recruitment FAQ (SSCASN) listed a maximum of 800 Kb in PDF for a scanned degree certificate and 500 Kb in PDF for a transcript, while the ID card had to be a JPEG of up to 200 Kb. That last detail is a useful reminder: not every document should become a PDF. Match the format each field asks for.
A second documented example: the SNBP 2026 registration guide for Indonesian university admission asks for each achievement certificate as a file of up to 2MB in pdf, png, or jpg, for up to three achievements. A one-page certificate can go up as a JPG; a PDF earns its place when one achievement has several sheets. Our summaries of the SSCASN upload requirements and the SNBP upload requirements collect the details with their sources.
Dokurapi prepares a copy of your file. It cannot guarantee that any portal will accept it, and the official notice for your intake is always the final word.
PDF or JPG? Pick the format per field
The most avoidable mistake is converting a document the field wanted as an image. In the SSCASN example above, the ID card, the red-background photo, and the selfie were all JPEG fields. A PDF in any of those slots is the wrong format, however small it is.
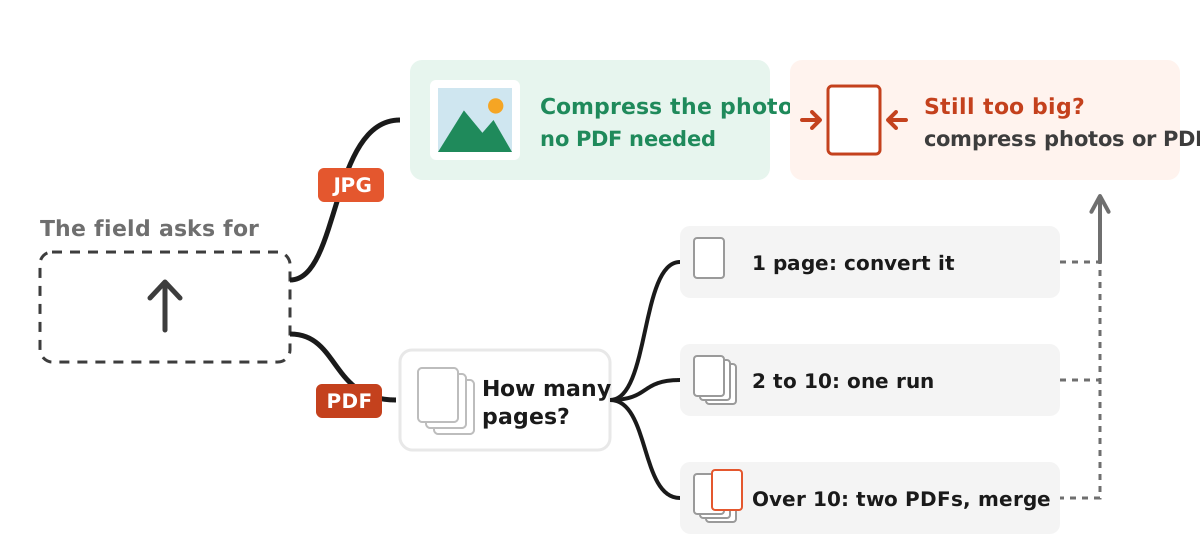
A simple rule: convert to PDF only when the field says PDF, or when one item has several pages that must travel together, such as a certificate and its attachment. For a single page where either format is allowed, a compressed JPG is usually the simpler choice, because a PDF wrapped around the same photo only adds structure. If you need a JPG of a set size, the 200 KB image tool and the 500 KB image tool open with that target already selected.
When you have more than ten pages, the merge tool joins up to 20 PDFs in the order you set. Check the result with the steps in how to check PDF page order, and see merging PDFs for submissions for naming and ordering conventions.
Troubleshooting
A page comes out sideways
Phones often record rotation as metadata (EXIF) instead of turning the pixels, and not every PDF builder reads that flag. Rotate and save a copy in your gallery app, or run the photo through the image compressor first, which redraws it the way the browser displays it.
iPhone photos will not load
iPhones can save photos as HEIF/HEIC, which many browsers outside Apple devices cannot open. Apple's support page explains that choosing Settings, then Camera, then Formats, then Most Compatible makes new photos save as JPEG.
Text is blurry after shrinking
The page budget is too small for that print size. Drop pages the portal did not ask for, crop the empty margins, or reshoot closer to the paper.
A small photo looks blurry on the page
The tool enlarges small images to fit the A4 page, so a low-resolution picture gets stretched. Go back to the original camera file, or reshoot.
The PDF is still too big
Usually one PNG or one full-resolution photo slipped through. Compress that image, or use route B and compress the whole PDF to the target.
More than ten photos
Make two PDFs and join them with the merge PDF tool.
Pre-upload checklist
- Format matches the upload field (PDF or JPG).
- Byte size is under the limit, checked with the size checker.
- Pages are in order with no duplicates.
- Seals, serial numbers, and signatures are legible when zoomed in on a phone.
- No fingers, shadows, or clutter on the page.
- The original photos are kept in case you need a different target.
Why it runs in your browser
Certificates, transcripts, and ID cards carry personal data that does not need to visit someone else's server just to change format. The tool has no upload form and no endpoint that receives files. Your photo list, the small preview thumbnails, and the finished PDF are handled inside the tab, and the Clear button empties the list when you are done.
Because the files never leave your device, there is nothing to delete from a server afterwards. The downloaded PDF does sit in your downloads folder, though, so clear it if you used a shared or public computer. If you want to see how this works and verify it yourself, read how browser-only file tools work.
Frequently asked questions
How do I convert a photo to PDF on my phone without an app?
Can I combine several photos into one PDF?
Why is my PDF as large as the original photos?
Are my photos uploaded anywhere?
Is a JPG to PDF conversion accepted by every portal?
Can the PDF have landscape pages?
Why does a small photo look blurry in the PDF?
Can I change the page order after the PDF is made?
Sources
- NIST: Prefixes for binary multiples
- SSCASN 2023 CPNS FAQ (BKN, Indonesia)
- Apple Support: Using HEIF or HEVC media on Apple devices
- PDF-LIB: Create and modify PDF documents in any JavaScript environment
- Panduan Pendaftaran SNBP 2026 (SNPMB)
Need help?Result not quite right, or unsure about a form rule? Ask Dokurapi support on WhatsApp. Please do not send personal documents in chat.
Chat on WhatsApp